I LOVE Ranch salad dressing. But, recently I've been diagnosed with Celiac Disease and have to be very careful about what I eat. I'm also lactose intolerant. This recipe takes care of both of those problems. It can be made into a dressing or a vegetable dip.
Dry ingredients:
4 TBSP. Black Pepper- ground
3/4 cup Parsley Flakes
1/8 scant cup Garlic Salt
1 TBSP. Salt
4 TBSP Granulated Garlic
6 TBSP. Granulated Onion
1 heaping TBSP Dill Weed
Blend together thoroughly. Store in an airtight container. I use a quart jar.
For Salad Dressing- normal recipe GF and LF following
1 heaping TBSP. dry mix
1 cup Buttermilk
1 cup Sour Cream
1 cup Mayonnaise
1 tsp. Lemon Juice
Combine well with a whisk. Refrigerate until use.
Karla's Gluten-Free and Lactose-Free Version
1 heaping TBSP Dry mix
Make LF Buttermilk : In a 1 cup measure: Add 1 TBSP. Vinegar, fill the cup with Lactose Free Milk. Stir with a whisk and set aside for 5 minutes to thicken
1 cup lactose-Free Sour Cream (Green Valley Organics brand)
1 cup Mayonnaise (Hellmans)
1 tsp. Lemon Juice
Combine with a whisk until smooth. Store in the refrigerator. Mark the date of the milk on it as a "use before" date.
Dip:
1 heaping tsp. Dry Mix
1 cup Sour Cream
Milk to thin it out.
Combine and let sit for 10-15 minutes for the mix to rehydrate.
Sunday, June 7, 2015

Wednesday, December 17, 2014
Thursday, December 11, 2014
Monday, January 27, 2014
Gluten-Free Pantry Spaghetti

Here in my take on one of her favorite meals. If in a hurry, I start with a commercial canned sauce. Brand names are listed, but I'm not in any way being compensated for using them.
Spaghetti Sauce:
1-1 1/2 pounds of lean ground beef (we like meat, I use 1 1/2#)
2 TBSP. diced dried onions
1/4 cup dried mushrooms
1 tsp. Garlic Powder
2 rounded TBSP. Spaghetti Sauce seasoning
2 bay leaves
1 TBSP. Olive oil (may need more)
A few hearty grinds of Black Pepper
1 jar prepared Spaghetti Sauce (Francesco Rinaldi Tomato & Basil is GF)
1 pkg. BARILLA gluten-free spaghetti *
In a two cup measure dump the dried onion & mushrooms. Cover with hot water and set aside. When veggies are re-hydrated, drain off the water.
In a deep cast iron skillet (I use an Erie chicken fryer!) Heat up the skillet, then add the oil to coat the bottom. Brown the ground beef until no longer pink. Drain off the grease and dispose of it. Add the seasoning, garlic, bay leaves, black pepper and drained onions and mushrooms. Stir fry until the spices are fragrant. Add the jar of spaghetti sauce. Turn the burner down to simmer. Boil the Spaghetti according to package directions. If the sauce is too thick, ladle a little of the spaghetti water in it to thin it out.
* Barilla just came out with a line of certified gluten-free products. They are delicious! Some of the other brands I have tried have been less than satisfactory. They were tasteless and had a gummy, nasty texture. Not so with the Barilla pasta. Their spaghetti cooks in a little over 10 minutes. It's firm, holds together well and has a really nice texture. I can't recommend this brand highly enough. Get some and try it!
Monday, December 23, 2013
Bacon Corn soup
It's -4º F here in Iowa today. The weather outside isn't fit for woman or beast. But, it's perfect weather for a nice, steaming hot bowl of soup!
I dug in my pantry and came up with this. Enjoy!

I dug in my pantry and came up with this. Enjoy!

Bacon Corn Soup ALA Karla
3 Strips thick
cut Bacon- cut into cubes
1 small diced onion or 1 heaping TBSP. dried onion
4 cups Water
1 TBSP.
Chicken or Vegetable Base
½ tsp Mrs.
Dash
Pepper to
taste
4 cups cubed
potatoes (about 10 small)
1 can (12oz.) Evaporated Milk
1 can Corn
regular-drained (can use creamed if you
desire a sweeter soup )
Saute’ bacon
cubes and onion (if using fresh) in a 4 qt. saucepan until bacon is browned and
onion translucent. Drain grease if excessive. Add Water, broth paste, Mrs. Dash and
potatoes. Boil until potatoes are
tender. Turn down heat. Add evaporated milk and corn. Season with pepper if desired. I don’t add salt because the broth base is
loaded with it. Simmer for 5 minutes to
develop the flavors. Serve with some
crusty bread on the side.
Pilot Bread: Try this modern day version of hardtack
Hardtack has been an emergency ration since time immemorial. Here's a look at pilot bread, a modern day version of hardtack and why you should consider including it in your survival gear.
by Leon Pantenburg
I've carried and eaten hardtack since my time in the Confederate infantry, and baking it is another history-related activity I enjoy. When I'm really going primitive, hunting with my flintlock rifle, I might pack hardtack, jerky and dehydrated corn for lunch.
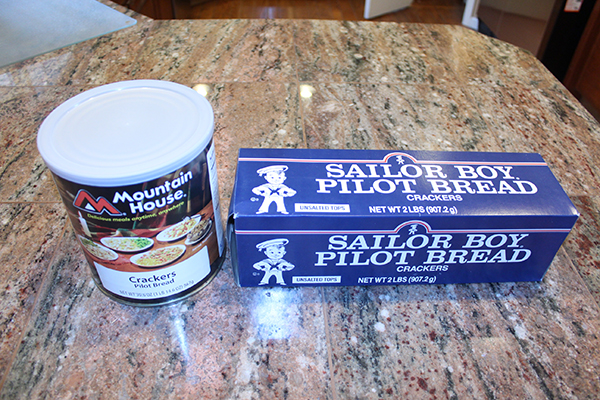 Pilot bread is a form of modern hardtack. Consider it as an addition to your storage foods.
But if you'd rather buy a similar hard cracker product for long term storage, take a look at pilot bread. I get my pilot bread from the Freeze Dry Guy, but the product is widely available. It's a good staple to have on hand - it's sorta tasty, durable, and has a long shelf life.
If I had to describe pilot bread, I'd call it a salt-less saltine, but with a tougher texture. While the bread is hard, it is easily bitten off, and the texture is much softer than the traditional recipe hardtack I make. Pilot bread also has fewer crumbs than a standard saltine. A nice feature is the durability - pilot bread with peanutbutter and/or fruit jam stands up well to travel in a daypack.
Pilot bread is a common storage food item in Hawaii, and Alaska and The Diamond Bakery "Saloon Pilot" cracker is available in many stores. Sailor Boy brand Pilot Bread is well-known in the Northwest United States and Alaska, and I got mine at the local Food 4 Less.
It is "a very inspirational food" in Alaska, according to the Sailor Boy Facebook page. Alaskans are among the last to eat hardtack as a significant part of their normal diet. Interbake Foods of Richmond, Virginia, produces much of the commercially available hardtack under the "Sailor Boy" label—98 percent of its production goes to Alaskans.
Originally imported as a food product that could handle rigorous transportation throughout Alaska, pilot bread has become a favored food even as other, less robust foods have become available. Alaskan law requires all light aircraft to carry "survival gear," including food.
The blue-and-white Sailor Boy Pilot Bread boxes are common at Alaskan airstrips, in cabins, and virtually every village. Whether it's topped with salmon spread, seal oil or old-school Crisco and sugar, chances are if you've ever lived in rural Alaska you're familiar with that long, rectangular, navy blue box. The Alaska Dispatch claims pilot bread is soul food for rural Alaskans -mothers give it to their babies to teeth on, village grocery stores, no matter how sparse, carry it on their shelves, and seldom does a hunting party venture out in the country, or a family head to fish camp, without a supply stowed away in someone's bag.
Lots of people have their favorite ways to enjoy them: topped with cheese or Spam or spread with peanut butter and jam or honey. You can also spread them with ground meat, cheese and tomato sauce and make pizzas. some people even know how to make "pizzas" with them.
For more info from the Alaska Dispatch click on pilot bread
While I use pilot bread frequently, I also bake hardtack for backcountry trips and the bread's conversational value around the campfire. Here is a very traditional hardtack recipe from the Civil War. When done, this hardtack has the consistency of a fired brick, and lives up to the nickname of "teeth dullers."
Army Hardtack Recipe
- 4 cups flour (preferably whole wheat)
- 4 teaspoons salt
- Water (about 2 cups)
- Pre-heat oven to 375° F
- Makes about 10 pieces
Place the squares on an ungreased cookie sheet in the oven and bake for 30 minutes. Turn each piece over and bake for another 30 minutes. The crackers should be slightly brown on both sides.
The fresh crackers are easily broken, but as they dry, they harden and assume the traditional texture.
Please click here to check out and subscribe to the SurvivalCommonSense.com YouTube channel - thanks!

Sunday, December 15, 2013
Avocado Curry with Chicken
Normally I have been posting recipes using just canned, dried or storage goods. Sometimes it's best to think outside the box and use what you have on-hand. Try something different to keep your taste buds alive. This recipe starts out with a very basic Curry Sauce. It's delicious even without the avocado. The full recipe uses fresh ingredients. You add whatever is in your pantry. The veggies may be fresh or canned. Add meat if you have it. Served over steamed rice, it makes a very filling meal. I don't know any Preppers that don't have a supply of rice on-hand!


Avocado
Curry (ALA
Karla)
Curry
sauce:
1 small Avocado
14 oz. Coconut milk
½ cup Chicken broth or water
3 TBSP. Soy Sauce
2-3 TBSP. Green Curry Paste (3 is really spicy)
2-3 TBSP. Green Curry Paste (3 is really spicy)
½ Lime, juiced (I used 2 TBSP prepared)
------------------------------------------------------------------
1 # Chicken boneless skinless thighs or breast meat-
cubed
½ small onion- cut into strips
2 TBSP. oil of choice
------------------------------------------------------------------
2 cups Green beans
1 large handful baby Carrots
1 small Zucchini- cubed
Big handful of “B” potatoes- cubed
½ green or red bell pepper cut into strips
1 small can chunk Pineapple with juice
Add
last to sauce right before serving:
1 cup large Fresh Basil Leaves
1 small Avocado
Combine curry ingredients in a 4 qt. heavy
saucepan. Use an immersion blender to
blend it smooth. You may also mix in a
regular blender. If sauce is too thick,
add more broth or water. Bring to a
boil, turn down to simmer while stir frying the other ingredients.
In a heavy skillet add a couple TBSP. of olive
oil. Add the chicken and onion stir
frying until it is just done. Using another ½ cup of broth deglaze the pan,
scraping up the flavor loaded fond. Add
this to the contents of the saucepan.
Add the veggies and pineapple to the curry sauce and
bring back to a simmer. Cook until
potatoes are done. Stir in the additional
avocado and fresh basil, cook until the basil wilts. Serve with hot steamed rice.
Garnish with
fresh basil and avocado.
Biomass stove survival cooking video: How to make Re-fried Beans
Beans are a staple of long term food storage, and for good reason. Beans are a great source of useable protein, contain no cholesterol and are rich in fiber. They are also a good source of Vitamins A and C, Thiamine, potassium and iron.

So, you already know all that. The point is, how can you serve beans regularly, while still adding some variety?
by Leon Pantenburg
This recipe comes from Jan LeBaron's cookbook: "Jan's Fabulous Food Storage Recipes: Converting Stored Foods Into Usable Meals."
This pinto bean recipe is simple and easy to prepare in advance. Serve beans with rice and you get a complete protein. As Jan recommends in her cookbook, combine this recipe with cornbread or Sopapillas or tortillas.
"When times are hard, this is a good meal to have every week," she comments in the cookbook.
I might add, when times are good, pinto beans can be part of a great, quick meal when everybody has somewhere to go during the evening! Make the rice and re-fried beans in advance and refrigerate. Then, all you have to do is brown some hamburger with a packet of taco seasoning. Warm and combine all these ingredients with some shredded cheese and lettuce and roll in a flour tortilla, and you have one of my favorite fast meals!
Combine these ingredients into a burrito and make a foil wrap, and put the packet in a re-sealable plastic bag for a quick meal on a dayhike or outing. At lunch or dinner time, make a campfire, and when the coals burn down, remove the foil wrap from the plastic bag and toss it on. Cook about five to ten minutes, then turn and cook another five to ten minutes. (Click here to learn how to make a foil wrap.)
Here's how to make the beans:
Favorite Family Pinto Beans
2-1/4 c pinto beans
2 quarts water
2 Tbs oil (optional)
1 Tbs onion, powder
1/4 tsp black pepper
1/2 tsp cayenne pepper
2 tsp salt
Soak the beans either overnight, or in boiling water for about an hour. Drain and cover with two quarts of fresh water, then bring to a boil over medium high heat. Reduce the heat so the beans merely simmer. Cover and simmer for 30 minutes. Add the remaining ingredients. Cover and simmer for about an hour. The beans should be tender and fragrant. Bite into one to see if it's cooked through. When they are tender, they're ready to eat.
To make re-fried beans: Scoop up as many juicy beans as you want to use and put them in a large skillet. Add a little fat, if desired. Heat the beans and their juice over a medium-high flame while mashing them with a fork or potato masher. Add more bean juice as needed to keep the mixture moist. When the beans are hot and mashed, with a few beans chunks, they are done. Serve with cheese as a dip or stuffed into tortillas.
Saturday, December 14, 2013
Instant Mocha Coffee Mix
I was really sad when my favorite "Double Dutch Chocolate" coffee mix was discontinued. So, always up for a challenge, I decided to try to make my own version. You should have most of these ingredients already in your pantry.
1 3/4 cup Powdered Sugar
3/4 cup Powdered Creamer
1/2 cup baking Cocoa (I used Dutch Processed)
1/3 cup Instant Coffee (reg or decaf)
 1/4 tsp. salt
2 rounded TBSP. Malt Powder
Sift ingredients together. Store in an air-tight container in a cool pantry.
Mix 3 rounded tablespoons mix into a mug with boiling water. Stir well.
It tastes better when sipped out of an Artisan mug...
Mocha Coffee Mix
1 1/2 cups non-fat Dry Milk1 3/4 cup Powdered Sugar
3/4 cup Powdered Creamer
1/2 cup baking Cocoa (I used Dutch Processed)
1/3 cup Instant Coffee (reg or decaf)

2 rounded TBSP. Malt Powder
Sift ingredients together. Store in an air-tight container in a cool pantry.
Mix 3 rounded tablespoons mix into a mug with boiling water. Stir well.
It tastes better when sipped out of an Artisan mug...
Tuesday, October 29, 2013
Bannock: How to make the survival bread of the north
Some simple flour recipes can be invaluable when bad stuff happens, you have hungry people to feed, and there aren't a lot of ingredients available.
by Leon Pantenburg
 It only took the addition of some other grains to make this basic bannock survival ration into a tasty, nutritious food. (Pantenburg photo)[/caption]
Bannock is the traditional bread of Canada and the Northwest. Native people had no access to wheat flour prior to the arrival of European traders, although some flour substitutes existed, like wild turnips or corn, dried and ground to a powder.
Bannock actually originated in Scotland. Because bannock could be quickly prepared from readily-available ingredients, and because these ingredients lasted a long time without spoiling, bannock became a staple of European fur traders and subsequently, the native people also.
But the original recipe is nothing but flour and water, and traditional bannock is essentially frontier junk food.
Here's how to add a few ingredients to make flour-based survival foods more nutritious.
Start by amending the flour. Basic, white, bleached all-purpose flour has virtually all the nutrients taken out of it in processing. To each cup of white flour, add one tablespoon of soy flour, a tablespoon of dried milk and a teaspoon of wheat germ. According to "Classic Sourdoughs: A Home Baker's Handbook" by Ed Wood, such an amendment combines enzymes and creates a complete protein, similar to meat.
I've used this amendment for years, and you can't taste the difference in the baked goods. Try amending the flour in all your survival recipes that use white flour, such as hardtack, and you'll feel the difference. Here is the traditional bannock recipe:
 Bannock Recipe
1 c flour
4 tsp double-acting baking powder
2 Tbs powdered skim milk
Stir ingredients together; stir in water to make dough moist. Knead dough until smooth. Place in greased cast iron skillet or Dutch oven over the campfire or on coals and bake about five to 10 minutes until the top is brown. Then turn the bread and brown the other side.
A handy way to prepare for a backpacking or hiking trip is to mix all the dry ingredients in a Ziplock bag. Just add 1/2 cup of water and knead in the bag. Then take out the dough, finish kneading and spread it in the pan.
(Practice baking the bannock by the campfire. Put the dough in a greased skillet, and place it near the campfire, propped at about a 60-degree angle with a stick. When the side nearest the fire browns, flip the bread and brown the other side. In a pinch you could bake it on a plank!)
SurvivalCommonSense Bannock Recipe
1/8 tsp salt
1 Tbs soy flour
1 tsp buckwheat flour
1 Tbs flax meal
2 Tbs stone ground whole wheat flour
4 tsp double-acting baking powder
Pace all the above ingredients in a one cup measure and add enough unbleached bread flour to make one cup of dry ingredients in volume. Add 2 Tbs powdered skim milk, and stir until thoroughly mixed.
Add enough moisture to make a moist dough, and knead until smooth. Place in a greased cast iron skillet and bake. If you're making this inside, bake at 425 degrees for about 20 minutes.
Except for the different ingredients, you can treat the improved recipe just like the traditional. Put the improved bannock mixture in a ziplock bag to make later on the trail, and you can cook it just like the traditional recipe.
With either recipe, bannock is a quick, easy way to make use of wheat flour. Both recipes are good survival tools that could prove to be really useful in your survival kit!
Here's an easy, simple recipe for grilling chicken.
(Here's a way to add some poetry and fun to your next campout: Mix up one of the above recipes and get it started cooking over the fire. Then whip out this Robert Service poem and read aloud: While the Bannock Bakes.)
Comments? Check out our Facebook page!
Thursday, October 10, 2013
Quick Pantry Chili
The cooler weather makes me want to cook more substantial meals. Preferably meals that can last a couple of days during the busy week. This recipe is for a stick-to-your-ribs chili using a lot of canned goods from the pantry. Feel free to use fresh vegetables from your garden, if you have them.
Quick Pantry Chili ala Karla
1-2# ground
beef (I use 2#. DH wants a meaty chili)
1 large
onion - finely chopped
1 clove of
garlic – minced
In an 8 quart stock pot: brown the ground beef with the onions and
garlic until cooked through. Drain the fat.
Add:
1 can fire
roasted tomatoes
1 can whole
cooked tomatoes (break up with a fork)
1 can pinto
beans
1 can Chili
beans (Bushs)
1 jar Salsa
1 can Tomato
soup + 1 can water
1 pkg.
McCormick Chili-O seasoning
Mix all
ingredients together and simmer for half an hour or more. Stir occasionally so it does not stick and
burn.
Top with a
dollop of sour cream and some chopped green onion. I like crushed Fritos instead of crackers….;)
ie: canned goods are regular sized cans.
Thursday, June 28, 2012
Buckaroo Beans: a great beginner Dutch oven recipe
Anyone with storage supplies of dried beans needs innovative ways to cook them. Here is a favorite starter recipe from the Central Oregon Dutch Oven Society.
 by Leon Pantenburg
People getting started in Dutch oven cooking are often somewhat intimidated when it comes to participating in a Dutch Oven Gathering or cookoff. One of the fool-proof recipes that is usually recommended to these folks is Buckaroo Beans. This recipe, from Amber Franks, and published in the Central Oregon Dutch Oven Cookbook, Volume One, makes use of several kinds of beans.
Dried or storage foods can easily be substituted for the fresh equivalents. Another nice aspect of this dish is that the beans can be cooked and simmered over a campfire in a Dutch oven.
Check out the recipe - you'll find yourself making it even when you don't need to prepare a meal under
survival circumstances!
Buckaroo Beans
1 lb ground beef
1 large onion, chopped
1/2 tsp garlic powder
1 tsp dry mustard
1/2 c ketchup
2 tsp vinegar
1 tsp Worcestershire sauce
1 tsp each of oregano, basil and dill
2 (14 oz) cans of kidney beans
1 (6 oz) can baby lima beans
1 (24 oz) can Boston style baked beans
In a 12-inch Dutch oven, brown hamburger with the chopped onion. Add seasonings and beans (undrained except for the lima beans). Mix together and add ketchup, vinegar and Worcestershire sauce. Cook at about 325 degrees for about one hour.
by Leon PantenburgPeople getting started in Dutch oven cooking are often somewhat intimidated when it comes to participating in a Dutch Oven Gathering or cookoff. One of the fool-proof recipes that is usually recommended to these folks is Buckaroo Beans. This recipe, from Amber Franks, and published in the Central Oregon Dutch Oven Cookbook, Volume One, makes use of several kinds of beans.
Dried or storage foods can easily be substituted for the fresh equivalents. Another nice aspect of this dish is that the beans can be cooked and simmered over a campfire in a Dutch oven.
Check out the recipe - you'll find yourself making it even when you don't need to prepare a meal under
survival circumstances!
Buckaroo Beans
1 lb ground beef
1 large onion, chopped
1/2 tsp garlic powder
1 tsp dry mustard
1/2 c ketchup
 |
| Visit our store! |
2 tsp vinegar
1 tsp Worcestershire sauce
1 tsp each of oregano, basil and dill
2 (14 oz) cans of kidney beans
1 (6 oz) can baby lima beans
1 (24 oz) can Boston style baked beans
In a 12-inch Dutch oven, brown hamburger with the chopped onion. Add seasonings and beans (undrained except for the lima beans). Mix together and add ketchup, vinegar and Worcestershire sauce. Cook at about 325 degrees for about one hour.
Wednesday, June 20, 2012
A common question among new off grid and/or cast iron cooks is "How do I season cast iron?" Here is the barbecue grill method I use, and it works really well!
by Leon Pantenburg
Cast iron cookware will last forever if you take care of it. But what happens if an implement is neglected and develops some rust? Or what about that crusty, dirty relic of an unsuccessful camping trip you find at a garage sale? At what point does it become unsalvageable?
Here is a quick way to re-season any piece of cast iron. Essentially, all you're doing is removing all the rust and residue, wiping down all the surfaces with a cast iron conditioner, and baking the oven outside in a hooded barbecue grill.
I've been using this method for years to periodically re-season and touch up the cast iron that belongs to a local Boy Scout troop. All these camp ovens have been used for several years, sometimes under duress and severe conditions, and they still work to help provide a mouth-watering meal!
Obviously, the more abused and rusty the implement is, the more work will be involved to bring it back into service. In some instances, I've had to take a particularly cruddy piece to an auto body shop and have it sandblasted.
But all this effort is worth it when you end up with a good piece of cast iron that will last indefinitely.
For a more comprehensive look at seasoning cast iron, click on Restoring a Cast Iron Treasure.
Check out the video below!
by Leon Pantenburg
|
| Visit our store! |
Cast iron cookware will last forever if you take care of it. But what happens if an implement is neglected and develops some rust? Or what about that crusty, dirty relic of an unsuccessful camping trip you find at a garage sale? At what point does it become unsalvageable?
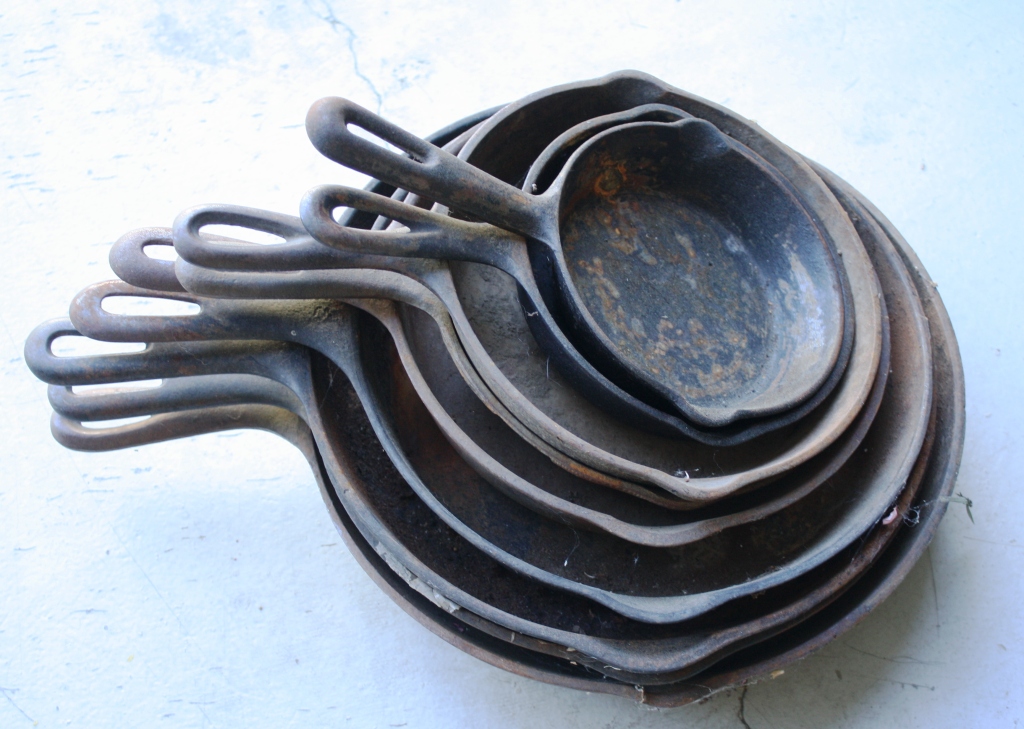 |
| These skillets can be restored to usefulness. |
Here is a quick way to re-season any piece of cast iron. Essentially, all you're doing is removing all the rust and residue, wiping down all the surfaces with a cast iron conditioner, and baking the oven outside in a hooded barbecue grill.
I've been using this method for years to periodically re-season and touch up the cast iron that belongs to a local Boy Scout troop. All these camp ovens have been used for several years, sometimes under duress and severe conditions, and they still work to help provide a mouth-watering meal!
Obviously, the more abused and rusty the implement is, the more work will be involved to bring it back into service. In some instances, I've had to take a particularly cruddy piece to an auto body shop and have it sandblasted.
But all this effort is worth it when you end up with a good piece of cast iron that will last indefinitely.
For a more comprehensive look at seasoning cast iron, click on Restoring a Cast Iron Treasure.
Check out the video below!
Monday, April 30, 2012
Asparagus Bacon Chowder
Part of having a survival mindset is figuring out how to use what you have on-hand at right that moment.
Here in Iowa we've been experiencing some weird weather. Hot when it's supposed to be cold, cold when it's supposed to be hot. This past week we had a cold snap of 40ºF during the day...brrrrrr I was in the mood for some nice warm soup and I didn't want to make a trip into the grocery store. After scrounging through my pantry, this is the result.
Asparagus Bacon Chowder
1# Fresh Asparagus (out of our garden that day)
6-8 cups Water (enough to cover asparagus & rehydrated potatoes)
1 TBSP. Chicken base paste
6 green onions (again, out of the garden) could use dehydrated
1 cup Potato dices-dehydrated
1 tsp. Mrs. Dash-regular
1 can PET evaporated Milk
1 heaping TBSP. Bacon TVP bits-dehydrated
1 cup shredded white cheese.
Pepper to taste
Salt to taste. (sample before adding, there is salt in the Chicken base)
In a large sauce pan add the water, chicken base & dehydrated Potato. Let sit for 10-15 minutes to reconstitute the potatoes. Meanwhile, cut the asparagus into 2 inch pieces. Dice up the onions. Add veggies to the saucepan,(may add more water to cover) then bring to a boil. Lower to a simmer and cook until the potatoes are done. Add the spices, bacon, cheese and can of milk. Gently heat through until the cheese melts.. Do NOT let the soup come back to a boil.
Serve with a slice of homemade Sourdough bread.....
Here in Iowa we've been experiencing some weird weather. Hot when it's supposed to be cold, cold when it's supposed to be hot. This past week we had a cold snap of 40ºF during the day...brrrrrr I was in the mood for some nice warm soup and I didn't want to make a trip into the grocery store. After scrounging through my pantry, this is the result.
Asparagus Bacon Chowder
1# Fresh Asparagus (out of our garden that day)
6-8 cups Water (enough to cover asparagus & rehydrated potatoes)
1 TBSP. Chicken base paste
6 green onions (again, out of the garden) could use dehydrated
1 cup Potato dices-dehydrated
1 tsp. Mrs. Dash-regular
1 can PET evaporated Milk
1 heaping TBSP. Bacon TVP bits-dehydrated
1 cup shredded white cheese.
Pepper to taste
Salt to taste. (sample before adding, there is salt in the Chicken base)
In a large sauce pan add the water, chicken base & dehydrated Potato. Let sit for 10-15 minutes to reconstitute the potatoes. Meanwhile, cut the asparagus into 2 inch pieces. Dice up the onions. Add veggies to the saucepan,(may add more water to cover) then bring to a boil. Lower to a simmer and cook until the potatoes are done. Add the spices, bacon, cheese and can of milk. Gently heat through until the cheese melts.. Do NOT let the soup come back to a boil.
Serve with a slice of homemade Sourdough bread.....
Friday, January 13, 2012
Survive the Flu Chicken Noodle Soup
uggghhh It's that time of year again..Flu Season. Yes, it got me! Yesterday I felt like death warmed over or, something a truck decided to squish. No way was I going to do any major cooking.. Luckily, I have a very well stocked pantry, so Pantry Chicken Noodle Soup came to the rescue. Yes, I know this isn't as good as the boil a chicken, make the broth & noodles type. But, in a pinch, it turned out down right tasty.
In a large 4 qt saucepan bring about 2 qts water to a boil.
To that add:
2 cubed potatoes
2 med carrots (peeled & diced)
1 stalk celery~diced (I used dried)
1 TBSP. Dried Onion
1/4 tsp. Dried Garlic
1 TBSP Dried Chives
Pepper to taste
(If you have dried veggies, this is a great way to use them)
Boil for about 5 minutes.
Then Add:
1/2 package of Kluski noodles or whatever type floats your boat!
1 (12.5 oz) pkg. Canned Chicken (Add broth and all)
1 (32 oz.) pkg Chicken broth (or broth base equivalent)
Simmer for another 5 minutes or so until the noodles are done.
You can just boil the veggies and noodles in the broth. But, I'm trying to cut down on salt and wanted more liquid in the soup. Therefore the added water in the beginning.
In a large 4 qt saucepan bring about 2 qts water to a boil.
To that add:
2 cubed potatoes
2 med carrots (peeled & diced)
1 stalk celery~diced (I used dried)
1 TBSP. Dried Onion
1/4 tsp. Dried Garlic
1 TBSP Dried Chives
Pepper to taste
(If you have dried veggies, this is a great way to use them)
Boil for about 5 minutes.
Then Add:
1/2 package of Kluski noodles or whatever type floats your boat!
1 (12.5 oz) pkg. Canned Chicken (Add broth and all)
1 (32 oz.) pkg Chicken broth (or broth base equivalent)
Simmer for another 5 minutes or so until the noodles are done.
You can just boil the veggies and noodles in the broth. But, I'm trying to cut down on salt and wanted more liquid in the soup. Therefore the added water in the beginning.
Sunday, November 20, 2011
Survival Recipe: Storage Food Rice Pudding
 |
| A great way to use up leftover rice. |
But no matter how much you like rice, a steady diet of any food can lead to diet monotony.
This recipe, from “Jan’s Fabulous Food Storage Recipes,” by Jan LeBaron” lends some variety to a food storage staple, and is an easy way to use up some extra, leftover rice! Click here to read the recipe.
Tuesday, October 18, 2011
Quick, Easy Method to Make Jerky in Your Oven


 |
| Finished jerky |
Regardless of your motivation, preppers, survivalists and folks looking for a way to preserve meat for long term storage should learn how to make jerky. Like any survival technique, it may be one of those skills that could prove to be vital sometime down the road.
This recipe can be done in your kitchen in about two hours. Click here to read how!
Blake Miller's "Best Jerky in Central Oregon" Recipe
 |
| Blake's recipe is great! |
Besides, who wants to go outdoors and be miserable! Here is GPS and land navigation expert Blake Miller’s jerky recipe. The meat should be completely covered by the mixture, so I’m not sure just how many pounds this recipe might be good for!
Click here to read the entire recipe!
Chili Mix

Variations, both geographic and personal, may involve different types of meat as well as a variety of other ingredients.
In a survival situation, chili is a great choice for using up some of the less-choice cuts of meat. The dish can help stretch limited supplies of meat to feed more people.
To read the recipe, click here.
Subscribe to:
Posts (Atom)