Thursday, December 11, 2014

Monday, January 27, 2014
Gluten-Free Pantry Spaghetti

Here in my take on one of her favorite meals. If in a hurry, I start with a commercial canned sauce. Brand names are listed, but I'm not in any way being compensated for using them.
Spaghetti Sauce:
1-1 1/2 pounds of lean ground beef (we like meat, I use 1 1/2#)
2 TBSP. diced dried onions
1/4 cup dried mushrooms
1 tsp. Garlic Powder
2 rounded TBSP. Spaghetti Sauce seasoning
2 bay leaves
1 TBSP. Olive oil (may need more)
A few hearty grinds of Black Pepper
1 jar prepared Spaghetti Sauce (Francesco Rinaldi Tomato & Basil is GF)
1 pkg. BARILLA gluten-free spaghetti *
In a two cup measure dump the dried onion & mushrooms. Cover with hot water and set aside. When veggies are re-hydrated, drain off the water.
In a deep cast iron skillet (I use an Erie chicken fryer!) Heat up the skillet, then add the oil to coat the bottom. Brown the ground beef until no longer pink. Drain off the grease and dispose of it. Add the seasoning, garlic, bay leaves, black pepper and drained onions and mushrooms. Stir fry until the spices are fragrant. Add the jar of spaghetti sauce. Turn the burner down to simmer. Boil the Spaghetti according to package directions. If the sauce is too thick, ladle a little of the spaghetti water in it to thin it out.
* Barilla just came out with a line of certified gluten-free products. They are delicious! Some of the other brands I have tried have been less than satisfactory. They were tasteless and had a gummy, nasty texture. Not so with the Barilla pasta. Their spaghetti cooks in a little over 10 minutes. It's firm, holds together well and has a really nice texture. I can't recommend this brand highly enough. Get some and try it!
Monday, December 23, 2013
Bacon Corn soup
It's -4º F here in Iowa today. The weather outside isn't fit for woman or beast. But, it's perfect weather for a nice, steaming hot bowl of soup!
I dug in my pantry and came up with this. Enjoy!

I dug in my pantry and came up with this. Enjoy!

Bacon Corn Soup ALA Karla
3 Strips thick
cut Bacon- cut into cubes
1 small diced onion or 1 heaping TBSP. dried onion
4 cups Water
1 TBSP.
Chicken or Vegetable Base
½ tsp Mrs.
Dash
Pepper to
taste
4 cups cubed
potatoes (about 10 small)
1 can (12oz.) Evaporated Milk
1 can Corn
regular-drained (can use creamed if you
desire a sweeter soup )
Saute’ bacon
cubes and onion (if using fresh) in a 4 qt. saucepan until bacon is browned and
onion translucent. Drain grease if excessive. Add Water, broth paste, Mrs. Dash and
potatoes. Boil until potatoes are
tender. Turn down heat. Add evaporated milk and corn. Season with pepper if desired. I don’t add salt because the broth base is
loaded with it. Simmer for 5 minutes to
develop the flavors. Serve with some
crusty bread on the side.
Pilot Bread: Try this modern day version of hardtack
Hardtack has been an emergency ration since time immemorial. Here's a look at pilot bread, a modern day version of hardtack and why you should consider including it in your survival gear.
by Leon Pantenburg
I've carried and eaten hardtack since my time in the Confederate infantry, and baking it is another history-related activity I enjoy. When I'm really going primitive, hunting with my flintlock rifle, I might pack hardtack, jerky and dehydrated corn for lunch.
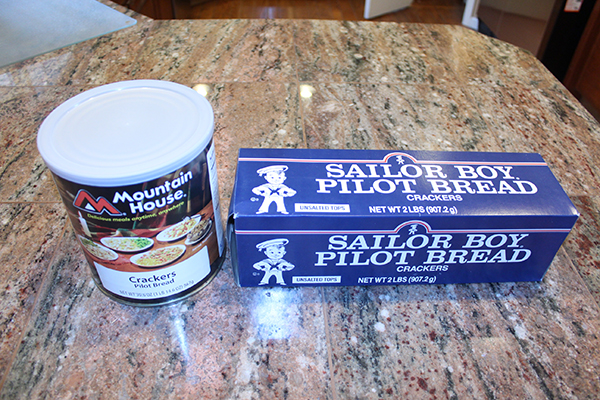 Pilot bread is a form of modern hardtack. Consider it as an addition to your storage foods.
But if you'd rather buy a similar hard cracker product for long term storage, take a look at pilot bread. I get my pilot bread from the Freeze Dry Guy, but the product is widely available. It's a good staple to have on hand - it's sorta tasty, durable, and has a long shelf life.
If I had to describe pilot bread, I'd call it a salt-less saltine, but with a tougher texture. While the bread is hard, it is easily bitten off, and the texture is much softer than the traditional recipe hardtack I make. Pilot bread also has fewer crumbs than a standard saltine. A nice feature is the durability - pilot bread with peanutbutter and/or fruit jam stands up well to travel in a daypack.
Pilot bread is a common storage food item in Hawaii, and Alaska and The Diamond Bakery "Saloon Pilot" cracker is available in many stores. Sailor Boy brand Pilot Bread is well-known in the Northwest United States and Alaska, and I got mine at the local Food 4 Less.
It is "a very inspirational food" in Alaska, according to the Sailor Boy Facebook page. Alaskans are among the last to eat hardtack as a significant part of their normal diet. Interbake Foods of Richmond, Virginia, produces much of the commercially available hardtack under the "Sailor Boy" label—98 percent of its production goes to Alaskans.
Originally imported as a food product that could handle rigorous transportation throughout Alaska, pilot bread has become a favored food even as other, less robust foods have become available. Alaskan law requires all light aircraft to carry "survival gear," including food.
The blue-and-white Sailor Boy Pilot Bread boxes are common at Alaskan airstrips, in cabins, and virtually every village. Whether it's topped with salmon spread, seal oil or old-school Crisco and sugar, chances are if you've ever lived in rural Alaska you're familiar with that long, rectangular, navy blue box. The Alaska Dispatch claims pilot bread is soul food for rural Alaskans -mothers give it to their babies to teeth on, village grocery stores, no matter how sparse, carry it on their shelves, and seldom does a hunting party venture out in the country, or a family head to fish camp, without a supply stowed away in someone's bag.
Lots of people have their favorite ways to enjoy them: topped with cheese or Spam or spread with peanut butter and jam or honey. You can also spread them with ground meat, cheese and tomato sauce and make pizzas. some people even know how to make "pizzas" with them.
For more info from the Alaska Dispatch click on pilot bread
While I use pilot bread frequently, I also bake hardtack for backcountry trips and the bread's conversational value around the campfire. Here is a very traditional hardtack recipe from the Civil War. When done, this hardtack has the consistency of a fired brick, and lives up to the nickname of "teeth dullers."
Army Hardtack Recipe
- 4 cups flour (preferably whole wheat)
- 4 teaspoons salt
- Water (about 2 cups)
- Pre-heat oven to 375° F
- Makes about 10 pieces
Place the squares on an ungreased cookie sheet in the oven and bake for 30 minutes. Turn each piece over and bake for another 30 minutes. The crackers should be slightly brown on both sides.
The fresh crackers are easily broken, but as they dry, they harden and assume the traditional texture.
Please click here to check out and subscribe to the SurvivalCommonSense.com YouTube channel - thanks!

Sunday, December 15, 2013
Avocado Curry with Chicken
Normally I have been posting recipes using just canned, dried or storage goods. Sometimes it's best to think outside the box and use what you have on-hand. Try something different to keep your taste buds alive. This recipe starts out with a very basic Curry Sauce. It's delicious even without the avocado. The full recipe uses fresh ingredients. You add whatever is in your pantry. The veggies may be fresh or canned. Add meat if you have it. Served over steamed rice, it makes a very filling meal. I don't know any Preppers that don't have a supply of rice on-hand!


Avocado
Curry (ALA
Karla)
Curry
sauce:
1 small Avocado
14 oz. Coconut milk
½ cup Chicken broth or water
3 TBSP. Soy Sauce
2-3 TBSP. Green Curry Paste (3 is really spicy)
2-3 TBSP. Green Curry Paste (3 is really spicy)
½ Lime, juiced (I used 2 TBSP prepared)
------------------------------------------------------------------
1 # Chicken boneless skinless thighs or breast meat-
cubed
½ small onion- cut into strips
2 TBSP. oil of choice
------------------------------------------------------------------
2 cups Green beans
1 large handful baby Carrots
1 small Zucchini- cubed
Big handful of “B” potatoes- cubed
½ green or red bell pepper cut into strips
1 small can chunk Pineapple with juice
Add
last to sauce right before serving:
1 cup large Fresh Basil Leaves
1 small Avocado
Combine curry ingredients in a 4 qt. heavy
saucepan. Use an immersion blender to
blend it smooth. You may also mix in a
regular blender. If sauce is too thick,
add more broth or water. Bring to a
boil, turn down to simmer while stir frying the other ingredients.
In a heavy skillet add a couple TBSP. of olive
oil. Add the chicken and onion stir
frying until it is just done. Using another ½ cup of broth deglaze the pan,
scraping up the flavor loaded fond. Add
this to the contents of the saucepan.
Add the veggies and pineapple to the curry sauce and
bring back to a simmer. Cook until
potatoes are done. Stir in the additional
avocado and fresh basil, cook until the basil wilts. Serve with hot steamed rice.
Garnish with
fresh basil and avocado.
Biomass stove survival cooking video: How to make Re-fried Beans
Beans are a staple of long term food storage, and for good reason. Beans are a great source of useable protein, contain no cholesterol and are rich in fiber. They are also a good source of Vitamins A and C, Thiamine, potassium and iron.

So, you already know all that. The point is, how can you serve beans regularly, while still adding some variety?
by Leon Pantenburg
This recipe comes from Jan LeBaron's cookbook: "Jan's Fabulous Food Storage Recipes: Converting Stored Foods Into Usable Meals."
This pinto bean recipe is simple and easy to prepare in advance. Serve beans with rice and you get a complete protein. As Jan recommends in her cookbook, combine this recipe with cornbread or Sopapillas or tortillas.
"When times are hard, this is a good meal to have every week," she comments in the cookbook.
I might add, when times are good, pinto beans can be part of a great, quick meal when everybody has somewhere to go during the evening! Make the rice and re-fried beans in advance and refrigerate. Then, all you have to do is brown some hamburger with a packet of taco seasoning. Warm and combine all these ingredients with some shredded cheese and lettuce and roll in a flour tortilla, and you have one of my favorite fast meals!
Combine these ingredients into a burrito and make a foil wrap, and put the packet in a re-sealable plastic bag for a quick meal on a dayhike or outing. At lunch or dinner time, make a campfire, and when the coals burn down, remove the foil wrap from the plastic bag and toss it on. Cook about five to ten minutes, then turn and cook another five to ten minutes. (Click here to learn how to make a foil wrap.)
Here's how to make the beans:
Favorite Family Pinto Beans
2-1/4 c pinto beans
2 quarts water
2 Tbs oil (optional)
1 Tbs onion, powder
1/4 tsp black pepper
1/2 tsp cayenne pepper
2 tsp salt
Soak the beans either overnight, or in boiling water for about an hour. Drain and cover with two quarts of fresh water, then bring to a boil over medium high heat. Reduce the heat so the beans merely simmer. Cover and simmer for 30 minutes. Add the remaining ingredients. Cover and simmer for about an hour. The beans should be tender and fragrant. Bite into one to see if it's cooked through. When they are tender, they're ready to eat.
To make re-fried beans: Scoop up as many juicy beans as you want to use and put them in a large skillet. Add a little fat, if desired. Heat the beans and their juice over a medium-high flame while mashing them with a fork or potato masher. Add more bean juice as needed to keep the mixture moist. When the beans are hot and mashed, with a few beans chunks, they are done. Serve with cheese as a dip or stuffed into tortillas.
Saturday, December 14, 2013
Instant Mocha Coffee Mix
I was really sad when my favorite "Double Dutch Chocolate" coffee mix was discontinued. So, always up for a challenge, I decided to try to make my own version. You should have most of these ingredients already in your pantry.
1 3/4 cup Powdered Sugar
3/4 cup Powdered Creamer
1/2 cup baking Cocoa (I used Dutch Processed)
1/3 cup Instant Coffee (reg or decaf)
 1/4 tsp. salt
2 rounded TBSP. Malt Powder
Sift ingredients together. Store in an air-tight container in a cool pantry.
Mix 3 rounded tablespoons mix into a mug with boiling water. Stir well.
It tastes better when sipped out of an Artisan mug...
Mocha Coffee Mix
1 1/2 cups non-fat Dry Milk1 3/4 cup Powdered Sugar
3/4 cup Powdered Creamer
1/2 cup baking Cocoa (I used Dutch Processed)
1/3 cup Instant Coffee (reg or decaf)

2 rounded TBSP. Malt Powder
Sift ingredients together. Store in an air-tight container in a cool pantry.
Mix 3 rounded tablespoons mix into a mug with boiling water. Stir well.
It tastes better when sipped out of an Artisan mug...
Subscribe to:
Posts (Atom)